

Accurate leveling is one of the most important activities in land survey, construction, road development, drainage work and civil engineering projects. A small error in elevation can cause major headaches if it affects foundations, floors, roads, pipelines, drainage systems or other structures.
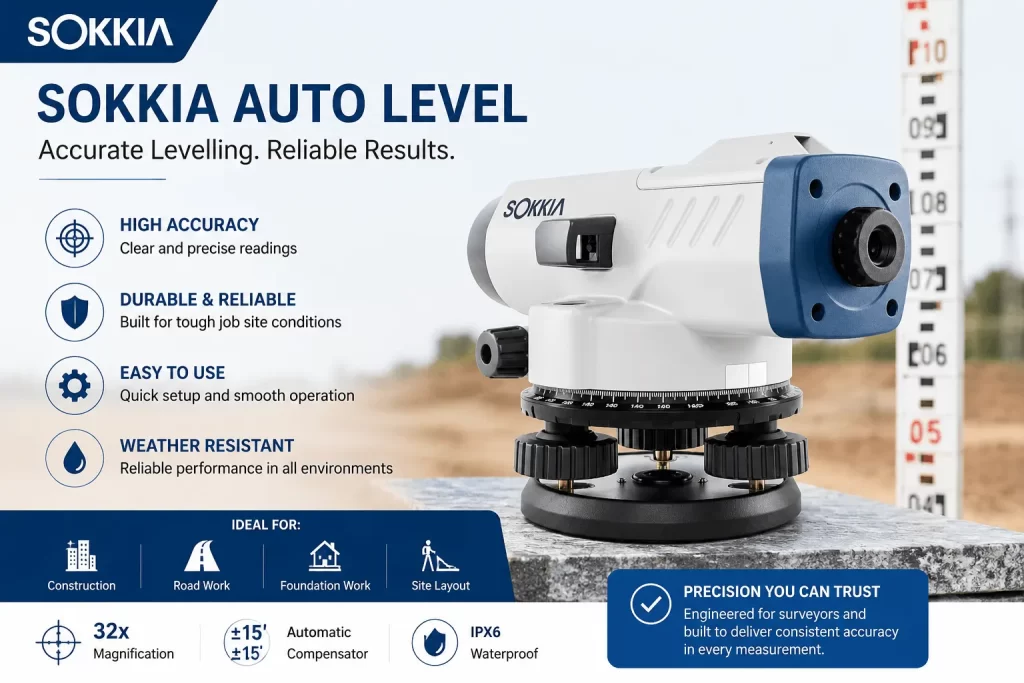
A Sokkia auto level is a popular optical surveying instrument that allows you to do leveling faster, easier and more reliably. It has an automatic compensator to establish a horizontal line of sight once the instrument has been roughly leveled using its circular bubble.
The Sokkia B-Series models are the B20, B30 and B40. Depending on the model, they provide 32x, 28x and 24x magnification respectively. The claimed 1 km double-run leveling accuracy is 0.3″ for B20, 0.5″ for B30 and 0.5″ for B40 without micrometer.
In this guide, we will explain step by step how to use a Sokkia auto level, common mistakes to avoid, how to improve leveling accuracy and what to consider when checking the Sokkia auto level price in India.
What Is a Sokkia Auto Level?
Sokkia auto level is an optical automatic leveling instrument used to find out different in elevation between points.
An automatic level employs a compensator which will hold a horizontal line of sight once the instrument is approximately level, unlike a conventional level which needs more manual adjustment. The B-Series has a pendulum compensator with magnetic damping and operates in a range of about ±15 min.
The basic setup generally consists of:
- Sokkia auto level instrument
- Tripod
- Levelling staff
- Circular bubble
- Focusing system
- Eyepiece
- Horizontal motion knobs
- Horizontal circle
- Automatic compensator
The instrument could be used for construction leveling, transferring elevations, checking formation levels, determining reduced levels, road work, foundation work, drainage projects and general surveying.
Why Use a Sokkia Auto Level for Accurate Levelling?
Accuracy is not just a matter of instrument, but also of proper setup, staff handling, observation technique and field procedures
Sokkia B-Series is built for fast set-up, easy sighting and toughness in tough conditions. The instruments are also protected against dust and water and are rated IPX6 for the B-Series.
Some important advantages are:
1. Automatic Compensator
An automatic compensator assists in establishing a horizontal line of sight after the instrument has been roughly leveled.
This reduces the amount of manual adjustment needed for routine leveling.
2. Clear Optical View
A clear and sharp telescope helps to identify the leveling staff by the operator and accurate readings can be taken.
3. Fast Setup
If the tripod and instrument are properly set up the circular bubble can be quickly centered before observations are taken.
4. Suitable for Construction and Surveying
A Sokkia auto level is employed in a diversity of elevation applications, including building construction, road projects, drainage, site grading and general civil engineering.
How to Use a Sokkia Auto Level Step by Step
It is important to have a consistent field procedure so as to get reliable results.
Step 1: Choose a Stable Place for Your Instrument
Choose a spot where the tripod will be stable.
Do not place the tripod on loose soil, unstable surfaces, vibrating platforms or in areas where construction equipment can interfere with the instrument.
The instrument should also have a clear line of sight to the leveling staff.
Accurate leveling relies on a stable set-up.
Step 2: Set Up Your Tripod
Open the legs of the tripod and set them firmly on the ground.
Set the leg lengths so that the head of the tripod is approximately horizontal.
If necessary, plant the feet of the tripod into the ground so that they do not move during observation.
Make sure all tripod clamps are securely fastened.
Step 3: Place the Sokkia Auto Level
Carefully place the Sokkia auto level on the tripod and fix it with the central fixing screw.
Do not over-tighten the screw.
The instrument should be firmly attached but handled gently so as not to put unnecessary stress on the instrument.
Step 4: Center the Round Bubble
Look at the circular bubble and adjust the tripod legs first until the bubble is near the center.
Fine adjustment is made with the foot screws.
You want to get the bubble in the middle circle.
The Sokkia documentation says the instrument is accurately leveled for operation when the bubble is within the center circle. The automatic compensator then finds the horizontal line of sight.
Step 5: Fine-Tune the Eyepiece
Before taking staff readings, set the eyepiece to ensure that the crosshairs are sharp and clear.
This step is often skipped by beginners.
If the crosshairs are out of focus the operator may experience parallax and obtain inconsistent readings.
Step 6: Work on the Leveling Staff
Set the staff vertically at the point of elevation to be determined.
Look thru the telescope and turn the focusing knob until the markings on the staff come into focus.
You need to be able to see the staff clearly and the crosshair should look nicely aligned.
Step 7: Search for parallax
Look in the telescope, moving your eye slightly from side to side.
If the crosshair appears to move relative to the staff, you have parallax.
Then concentrate until the staff and crosshair are just in line.
One of the most important steps to getting consistent readings is to eliminate parallax.
Step 8. Get the Back Sight Reading
When you have the instrument properly adjusted, place the staff on a known point.
Let us take the first reading called Back Sight (BS).
The known point could be a benchmark or any other point with known Reduced Level (RL).
For example:
Known RL = 100,000 m
Back Sight = 1.500m
Then:
Height of Instrument (HI) = RL + BS
HI = 100.000 + 1.500 = 101.500 m
Step 9: Do the Fore Sight Reading
Place the staff at the point to be read.
Read the Fore Sight (FS).
For instance:
HI = 101.500 m
FS = 2,000 m
Thus:
RL = HI – FS
RL = 101.500 – 2.000 = 99.500 m
By this simple calculation the surveyor can figure out the elevation of the new point.
Step 10. Take Intermediate Sight Readings
If several points are to be surveyed from the same instrument position, intermediate sight readings can be taken.
Such readings are commonly employed for:
Surveys at ground level
Building plans.
Road construction levels
Drainage levels Foundation levels Site grading
Make careful record of each reading in the field book.
Understanding the method HI
The Height of Instrument method is one of the simplest methods to determine elevations in leveling.
The basic formulas are :
HI = RL + SB
and .
HI-IS = RL
or a
RL = HI – FS
Where:
RL = Reduced Level BS = Back Sight
IS = Sight Intermediate
FS = Fore Sigh
HI = Height of Instrument Eg.
Assume a benchmark with RL of 150.000 m.
The back sight reading is 1,250 m.
Thus:
HI = 150.000 + 1.250
HI = 151.250 m
If the reading of the staff at point A is 2.100 m:
RL of Point A = 151.250 – 2.100
RL of Point A = 149.150m
The surveyor can use the same procedure to find the elevations of other points.
How to Improve Sokkia Auto Level Accuracy
The use of a good instrument does not mean that the results obtained will be correct. Equally important is good surveying practice.
Staff should be kept upright
“The staff must be upright.
If a staff is tilted, the reading may be higher than the reality.
If the circular bubble on the staff is available, use it or gently rock the staff while the observer identifies the minimum reading.
Balance of Sight Distance
Try to keep the back-sight and fore-sight distances roughly equal where you can.
Balanced sight distances reduce the effects of some instrumental and atmospheric errors.
Avoid Long Sight Lines Without a Purpose
Very long observations can make the staff harder to read and may increase the effect of atmospheric conditions.
Select instrument positions that are useful for good visibility.
Avoid Vibrations
The tripod can be disturbed by heavy machinery, vehicles and construction activity.
If the instrument is vibrating, wait until the disturbance has ceased before making an observation.
Check the bubble often
The compensator will automatically keep the line of sight within its operating range, but the circular bubble should still be checked in the field.
Check the setup if the tripod is disturbed.
Safeguard the Instrument
Store the instrument protected when not in use.
Do not subject unnecessarily to dust, rain, extreme temperatures or mechanical impact.
Sokkia’s B-Series is designed for the rigorous of difficult field conditions and is IPX6 protected, but long-term performance also depends on proper care and storage.
Common Mistakes When Using a Sokkia Auto Level
Beginners are prone to making small mistakes that can affect the final survey results.
1. Incorrect Tripod Position
If the tripod is not placed firmly, it can move during the observations.
2. Not Removing the Parallax
Readings may be inconsistent if the eyepiece and staff are not correctly focused.
3. Staff at an Angle
Even a small tilt of the staff can affect the reading seen.
4. Vibration Data
Do not take an observation when the instrument or tripod is moving.
5. Bad Field Notes
Even if the instrument observation is correct, the BS, IS or FS values can be wrongly recorded and this can lead to calculation errors.
6. Instrument calibration ignored
The periodicity for checking survey instruments is dictated by the manufacturer’s recommendations and the project’s requirements.
Models of Sokkia Auto Level
Sokkia’s B-Series offers a number of automatic level models.
The B20 provides 32x magnification of the telescope and has a stated standard deviation of 0.7 mm for 1 km double-run leveling without the use of a micrometer. The value given is 0.5 mm measured with a micrometer.
It may be used when more accurate leveling is required.
The B30 has 28x magnification and claims a standard deviation of 1.5mm for 1km double-run leveling without micrometer.
It can be suitable for general surveying and construction use.
The B40 offers 24x magnification and a stated 2.0 mm standard deviation for 1 km double-run leveling without a micrometer.
It is designed as a practical automatic level for general field use.
Sokkia Auto Level Price: What Should You Consider?
One of the most asked questions by buyers is the Sokkia auto level price in India.
The price may vary according to the model , specifications , accessories , warranty , calibration and current market conditions . There are different models of Sokkia auto level available for different surveying purposes and construction needs.
When you are comparing Sokkia auto level prices look for:
- Model and accuracy
- Included accessories
- Warranty and after-sales support
- Calibration and service facilities
- Genuine product and accessories
- Supplier reliability
Check out latest Sokkia auto level price? Contact us to know current price, model availability and customized quotation based on your requirements.
Sokkia Auto Level vs Other Surveying Instruments
Different surveying instruments are designed for different purposes.
Automatic level
The auto level is used mainly for measuring elevation differences and for the transfer of levels.
If you mostly need construction leveling, foundation checking, roadwork or drainage levels then an Auto Level can be a good choice.
Total Station
A total station combines electronic angle and distance measurement. It can be used for surveying, coordinate measurement, setting out and detailed site work.
A Total Station can provide a lot more functionality than a traditional optical level if you need to measure both angles and distances in a project.
Robotic Total Station
Robotic total stations (RTS) are able to perform automated instrument control and can reduce the amount of manual work involved with some surveying workflows.
Imagine a Robotic Total Station for expansive construction sites, layout tasks, and scenarios where productivity and automated target tracking are vital.
When Should You Choose a Sokkia Auto Level?
A Sokkia auto level can be a good option when your project primarily requires reliable elevation measurement.
Typical applications include:
- Building construction
- Foundation levelling
- Road construction
- Drainage projects
- Land development
- Earthwork
- Site grading
- Concrete slab levelling
- Pipeline projects
- General civil engineering
- Topographic levelling
If your project also requires coordinates, angles, distances and point setting-out, you may need a more advanced surveying solution such as a total station.
Final Tips for Accurate Levelling
For consistent results with a Sokkia auto level, follow these simple rules:
- Set the tripod on stable ground.
- Secure the instrument properly.
- Centre the circular bubble.
- Focus the eyepiece correctly.
- Remove parallax before taking readings.
- Keep the staff vertical.
- Keep BS and FS distances reasonably balanced.
- Avoid observations during vibration.
- Record every reading carefully.
- Perform appropriate checks and calibration.
- Protect the instrument during transportation and storage.
- Recheck important elevations before finalising the work.
Conclusion
A Sokkia auto level is a useful and dependable tool for accurate elevation measurement in construction and surveying. It has an automatic compensator that makes leveling easy. Sokkia’s B-Series has different magnification and accuracy levels for different field needs.
But the instrument is not enough to produce good results. Correct setting of the tripod, adjustment of the bubble, focusing, handling of the staff, balanced sight distances, careful recording in the field-book, are all essentials.
Before purchase, do not just choose an instrument by its advertized cost, compare the specifications, accessories, warranty, service support and current price of Sokkia auto level.
An auto level can be an efficient tool if all you need is elevation measurement. For more complex surveying requirements with angles, distances and coordinates, consider a Total Station, and large automated construction workflows may benefit from a Robotic Total Station.
Selecting the right surveying instrument according to the accuracy, productivity and application requirements of the project can eventually save time and cost and improve the quality of survey results.